
RV trips are a lot of fun. You can go virtually anywhere the road will take you and bring all the comforts of home with you.
However, a leak will quickly put an end to your good time, which is why you should bring liquid EPDM with you and understand how to do the following.
Before You Begin
While it’s tempting to simply go up on your roof and start applying liquid EPDM to anywhere you see RV roof leaks, take an extra moment before you get started. It’s vital that you make sure you’re getting the area responsible the first time.
Unfortunately, this won’t always be obvious. RV roof leaks can be sneaky. You might follow the leak from inside the RV and think you know exactly where it is, but that might only be because the water gets inside your roof and then runs to the corner before it’s visible to you.
Even after you’ve found the area you believe to be the source, there could be other RV roof leaks in the area, so check around.
Note: this is why we recommend applying EPDM before any RV roof leaks ever even occur. If you simply cover the entire roof, they’re just not going to happen.
Do Some Cleaning
Next, you want to make sure you sufficiently clean the area where the leak happened. It doesn’t need to look brand new, but you can’t leave any dust or debris. Otherwise, the seal you’re trying to complete with your liquid EPDM will be faulty and you could end up with another leak immediately.
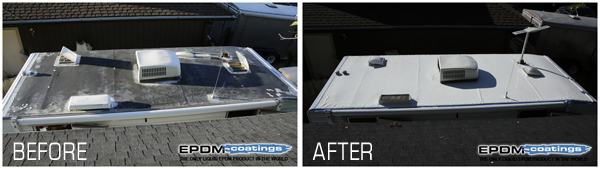
Apply Your Liquid EPDM to the RV Roof Leaks
You’re now ready to begin. If you’re using EPDM that comes in a spray bottle, you can simply aim and press the nozzle. The container will tell you how much is necessary, but, obviously, you want to make sure the entire area is sufficiently covered.
If you have a bigger job, you’ll want the kind that is applied like paint. This will require you to mix it beforehand. Again, the container will tell you how much water to use.
Then, just use a brush or roller and apply it to the area. You’ll notice that it already begins curing the second it hits the surface. This is also why you want to move quickly, so the liquid doesn’t begin curing too quickly.
Wait a Day
Ideally, you want to give your EPDM a day to cure. As long as it’s not going to rain, you can simply leave your RV in place while you explore the city or hang out at the RV park. If you’re at home, even better. Just don’t use the RV for about a day.
Before you drive it again, check the roof of your RV to ensure the EPDM has completely cured. It does best in temperatures of 55 degrees or higher, but this liquid will work regardless of the climate. You’ll simply find it takes a little more time.
That’s all it takes. This simple process will repair any leak in your RV quickly and without costing you a fortune. So, before your next trip, make sure you bring some with you, just in case.