

RV Customer
Dear Rv Roof Magic and EPDM Coatings;
I wanted to write to you and your potential customers about our recent experience using your Liquid Roof product to replace/repair the roof on our 1995 Fleetwood Flair motor home. I have also included a few pictures of the before and after.
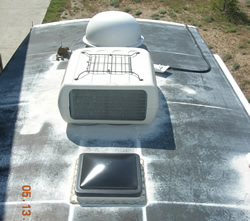
Before
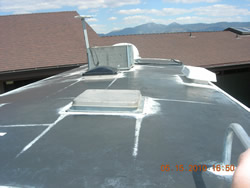
After
What happened:
Our roof was damaged by the full body cover. We live in the Southern Sierras and we had our coach parked outside for the winter in the full zip-up cover. Too much stuff in the RV bay of the garage. While the cover is a great product, the winds were so strong and lasted for hours at a time, the top of the cover rubbed 90% of all the paint off of the EPDM sheeting in a few months, exposing the black. We had no idea this was happening and by the time we removed the cover in the Spring, there was very little paint left, as you can see from the before pictures. Every time we had to get on the roof, we would get covered in black!!! It was a real mess.
The search:
I had replaced the EPDM roof on my Adobe ranch house in Colorado about 10 years ago so, I thought I'd tackle the job. Well, I got to thinking about removing all the trim, roof, roof attachments, etc. and decided to not go that route. I then contacted several RV repair facilities and saw what they wanted to repair our rig and, while our coach is in great shape, the thousands of dollars was way too high for the work they were going to do. Especially when you consider they are going to put on exactly what we already had and it rubbed right off. I started looking on the web for alternatives. I have to tell you, I just about fell out of my chair when I stumbled across your web site at EPDM Coatings. I did hours of research on your product and felt very confident in it and myself doing the job so, we ordered. It arrived in only a few days. Great shipping!!
The repair job:
- We watched a couple of the videos again and went to work.
- We removed the roof vents, AC cover and all the loose caulking and dirt.
- This took about 2 hours.
- I patched a couple rips that we caused by walking on the roof.
- This took me a 1/2 hour.
- I then mixed the 4 gallons of EPDM base with the catalyst.
- This took me longer than the recommended time on the bucket of 2 to 3 minutes.
- I mixed it until the color was uniform throughout the whole container and this was at least 10 minutes.
- By uniform, I mean there were no streaks of catalyst seen in the base anymore.
- I then poured the mixture into (2) gallon pails.
- I first applied the mixed EPDM, using a brush, on the edges of the roof.
- The roof curves over the edge and runs down the side of the coach about 2 inches.
- Brushing it on prevents the EPDM from running down the side.
- I brushed about 4" on the top of the roof and down the 2" sides.
- This took about 1 hour complete
- Liz brushed it around all of the roof openings, vent frames, satellite dome, TV antenna and cables.
- Filling the screw holes is a key item, in my mind, so we took extra care to fill them fully.
- This took about 1 hour as well.
- Now we were ready for the final step..... Wooo-Hoooo
- I marked-off sections of 40-sqft.
- Loaded the remaining mixture into 2 gallon pails.
- Working one section at a time, front to rear. (You have to get off the roof somehow and not paint yourself into a corner.
- Poured it out in an "S" shape.
- Spread it with a floor squeegee.
- Rolled it out evenly, using a 1/4" nap roller.
- This took us a whopping 40 minutes to complete the entire roof surface. No Kidd'n!!!!
Overall evaluation:
- Basically, our roof was not in that bad of shape as far as the condition of the sheeting goes. Yes, it was all black, with just about zero white left but, we only had (2) small spots that needed repaired. This made the prep time much shorter and less involved.
- It was in the mid 70's, slightly breezy and a bright sunny day when we applied the EPDM. While this was great working weather, it did pose a slight problem when applying the material.
- It took a while for the mixture to really get going during the curing process, prior to applying it to the roof. It was certainly 2 hours of waiting.
- The roof, being DARK BLACK, soaked-up the sun's rays and was at least 100 degrees. This seemed to make it more difficult to brush on the EPDM. I moved the coach to the side of garage to get less wind and more of an angle to the sun for rolling the roof.
- The rig wont fit into my garage now, since I repaired the air bags, put new tires on it and added the King Dome.
- Even with the environment issues we had to deal with, I am TOTALLY impressed with this product. While it made complete sense to me that it should work in the manner it was described, very few things ever do. This product fulfills its promise.
- As far as applying this solution, it is everything you say it is.... and more.
- I am anxious to see how it's longevity is, but see no reason why it wont last for years. Especially in our area of the country. The coach will be spending the summer in Colorado, where we get much more rain and lots of hail. I will be reporting on how Liquid Roof stands up to these elements.
- I am already endorsing your product to many of my friends and those who have seen it are amazed at the final outcome.
- Thank you very much for a very cost effective solution for a very wide-spread problem in the RV'g industry.
- One of the best aspects of your product is the overwhelming amount of information on how to prepare the surface, what the product is made of, how to mix it, and how to apply it to the roof. This is a very well done web site and I can tell the quality of people you have in your company from just reading thru it.
Suggestions: EPDM Coatings
- After doing this, for the first time, I would have rather ordered the product in the (1) gallon cans as opposed to the (5) gallon bucket. It would have been easier to work with. However, the cost difference between the (5) gallon bucket and buying (4) 1-gallon cans was too much. I'm not sure why the delta was so wide.
- It would be good if you could show an actual video of someone brushing the mixture on the sides of an RV roof so they can see how it goes on when the surface is vertical and curved. It doesn't spread very easily and, as mentioned earlier, if you put too much on to get it to spread smoothly, it will most-likely run if you're not careful.
Suggestions: Future Customers
- Buy it!! This product is unbelievable.... even after you apply it. You'll find yourself just staring at it and saying out loud " And they wanted $3,000 to do this at the shop!!!"
- Be careful on vertical surfaces. Add a little more at a time to the brush until it flows smoothly on the roof and use that amount. If you add more than that, it will run. It's a good idea to watch what you have already covered, making sure the EPDM doesn't sag/run a few minutes after you brushed it on.
- If you have cracks in your roof, make sure you seal them using the appropriate method, before you apply the Liquid Roof. i.e. I had a crack in my EPDM sheet. I experimented first and just covered it with Liquid Roof to see what would happen. After a couple days, it sealed up mostly but not all the way. I had to put some adhesive under the original EPDM sheet, then cover with self leveling caulk and re-coated the small area with Rubber Roof. All is good, but I should have done that first.
- Do the work inside, if at all possible. We did ours outside and it would have been a much cleaner and easier job if we had not.
EPDM Coatings...... THANK YOU VERY MUCH FOR A GREAT PRODUCT.
Kidd Filby and Liz Santi