

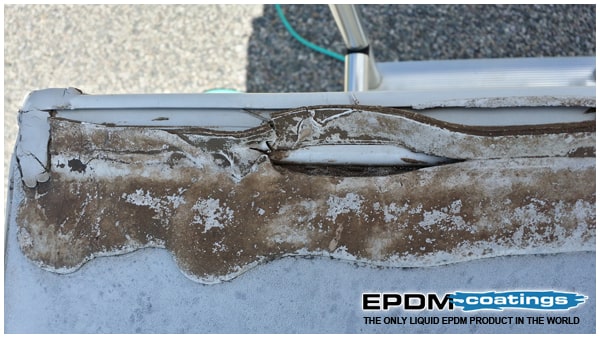
Before


Preparation


Competed Job


To the folks at EDPM coatings. I’m sending several emails with photos attached to each email. These are my before, during and after photos of my 23 foot, 2000 Jayco Eagle RV roof. I’m a 1st time RV owner and a single woman. I’ve seen lots of how-to "YouTube" videos for working on my RV but there seem to be very few that are done by women. So...when wondering if this is a doable DIY job, the answer is...yes! This is true for the lady RV owners as well!
After a 1 1/2 year search, I purchased my used RV in September of 2014. The previous owner and myself, both live in sunny New Mexico. The RV had always been housed outside and it still is. I was lucky to have purchased my RV from the original owner, who took very good care of the rig overall but he had neglected to do any maintenance on the roof (which was almost 15 years old). At the time of my purchase, I knew that the roof was in need of some work but other than that, the overall condition was so good that I was willing to make the purchase, knowing that the roof would be a project. There were a couple of roof issues. First, the factory caulking that was on the roof was old, discolored, cracked, pulled away from the surface in many areas and actually leaking in a few small spots. Second, the original sealant on the membrane was so deteriorated in some areas, that there were black areas that were completely exposed. The good news was that the actual membrane was still in good shape.
I had heard about the crazy prices that RV repair centers were getting for doing this type of roof repair. I’m somewhat handy and I actually enjoy doing some projects such as this. I started doing my online research. I watched videos. I read RV forums. I called your customer support line and asked MANY questions. As a result, I worked out a RV roof repair and restoration plan.
Here is what I did:
- The first step was to remove any of the old caulking that could easily be removed. Clean the caulked areas with the appropriate cleaning product and re-caulk with butyl caulking. Then give the new caulking several weeks to properly and thoroughly cure.
- Once that was done. It was time for the EDPM. In preparation, I removed AC shroud and the refrigerator roof vent cover. I power washed the entire roof with plain water (no soap, etc).
- I blew the roof dry with an electric leaf blower and then gave it some additional time to completely dry in the sun. We are in the high desert, so this did not require a lot of time.
- I had acquired all of the recommended tools (paint brush, squeegee, roller, stir stick for the drill, drop cloth, etc) I mixed the EDPM and applied it as directed.
As you can see from the photos, it turned out great! Please note that I did this job solo (without a helper). I had also purchased roof vent covers, which I installed after the new EDPM was dry and cured. BTW – The AC shroud was original. As a result, it was old and cracked and even patched in several places. I applied a coat of the left-over EDPM to the AC shroud and it turned out great as well! I know that I will eventually need to replace it but if this allows me to get a couple of more years out of the original one....all the better!
Photos Before1, Before2, Before3 and Before4 are truly before, as it was when I purchased the RV. You can easily see the old, dry and cracked caulking.
Photos Before2-1 and Before2-2 are photos of the seams after the old caulking was removed, in preparation for the application of the new butyl caulking.
Thank you,
Belinda B
Chimayo, New Mexico